Homemade incubators

Do you keep livestock? Having any problems? Want to talk about it, whether it be sheep, goats, chickens, pigs, bees or llamas, here is your place to discuss.
User avatar
glenniedragon
A selfsufficientish Regular
Posts: 699
Joined: Mon Jan 23, 2006 1:53 pm
Location: Wellington, South West UK
Contact:

Homemade incubators

Post: # 12603Post glenniedragon »

I found a site online and based on their instructions, I've had a go at building a homemade incubator. Its probably cost around 20 quid, I've borrowed a Brinsea incubator at the moment, but I'm going to use my 'homegrown' one as a brooder as you can fiddle with the temperature.
Here's what I used....

1 large polystyrene box used to transport tropical fish (begged from pet shop-free!)
1 thermostat kit from velleman (with highter rage thermistor) £10
1 12v downlighter kit with 25w bulb (£2-ebay)
1 wine making thermometer (already had)
2 brackets for thermometer( £2 fish shop)
Weld mesh panel for floor (£3 from B&Q)
wooden floor supports (already had)
cake tin for water (to go under the floor)
1 piece plexiglass for viewer

I put together the electronics kit in one afternoon- it was really straight forward as it's for kids use as an educational thing so it comes with full instructions. Wired up the transformer to bulb and board. Made holes in the box- for ventilation and to put the light in. Then I cut a ledge in the lid to fit the viewer in and taped it down. Measured the floor and cut a piece of weld mesh the same size and fitted supports cut from wood to lift the mesh off the floor and the cake tin can slide under. Fitted the thermometer and tested! IT WORKS!! I can maintain a constant temperature! WOW, :cheers: I am so chuffed at this project I had to share it, I'm now considering getting complicated and adding another 12v power source to support an old chip fan from our old PC to make it a forced air model.....sounds simple I might just have a go...I'll probably change to a wetbulb thermometer as I've seen those on ebay too....

Full of pride in my own ingenuity
kind thoughts
Deb

Wombat
Site Admin
Site Admin
Posts: 5918
Joined: Tue Nov 23, 2004 8:23 pm
Location: Sydney Australia
Contact:

Post: # 12669Post Wombat »

That's great Deb!

How about a couple of photos?

Nev
Garden shed technology rules! - Muddypause


Our website on living more sustainably in the suburbs! - http://www.underthechokotree.com/

User avatar
Muddypause
A selfsufficientish Regular
Posts: 1905
Joined: Mon Apr 11, 2005 4:45 pm
Location: Urban Berkshire, UK (one day I'll find the escape route)

Post: # 12684Post Muddypause »

I love it when people show the sort of resoucefulness that can make something out of a pile of bits like that.
Stew

Ignorance is essential

User avatar
glenniedragon
A selfsufficientish Regular
Posts: 699
Joined: Mon Jan 23, 2006 1:53 pm
Location: Wellington, South West UK
Contact:

pictures

Post: # 12692Post glenniedragon »

I'd love to show off my creation, however our digital camera has gone la la since OH took it away for the weekend (coincidence? I think not!) have seen a cheap one in T***o (£39!) and as soon as possible will post some piccies. Thanks for the encouragement guys!

Kind thoughts
Deb

Wombat
Site Admin
Site Admin
Posts: 5918
Joined: Tue Nov 23, 2004 8:23 pm
Location: Sydney Australia
Contact:

Post: # 12787Post Wombat »

Onya mate! look forward to the piccies!

Nev
Garden shed technology rules! - Muddypause


Our website on living more sustainably in the suburbs! - http://www.underthechokotree.com/

User avatar
glenniedragon
A selfsufficientish Regular
Posts: 699
Joined: Mon Jan 23, 2006 1:53 pm
Location: Wellington, South West UK
Contact:

Photos

Post: # 13202Post glenniedragon »

I've had a go taking some piccies.....I'm no David Bailey but I hope you get the idea!
Image 
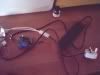
Assembled bits- black box is 12v transformer.
Image 
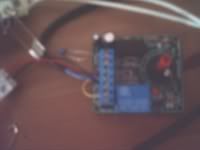
Close up of thermostat. Wire with blue bulb is the thermistor- I have now added a longer wire so the unit sits outside the box
Image
How I put it all together
Image
Switched on! you can just make out the thermometer through the plexiglass viewer. Yipee!

User avatar
Ireland-or-bust
Barbara Good
Barbara Good
Posts: 128
Joined: Sun Mar 26, 2006 4:09 pm
Location: Ireland

Post: # 16371Post Ireland-or-bust »

is the heat provided by the buld only?
i didnt see anythin gelse on the parts list.

wold chooks not mind lights going on and off all the time?


mark
--------

Shirley
A selfsufficientish Regular
Posts: 7025
Joined: Fri Sep 30, 2005 9:05 am
Location: Manchester
Contact:

Post: # 16374Post Shirley »

Nice one Deb....

(missed this when you originally posted the pics or I would have commented sooner)

Very impressed!!! Fingers crossed you will hear the patter of tiny chook feet in due course!!
Shirley
NEEPS! North East Eco People's Site

My photos on Flickr

Don't forget to check out the Ish gallery on Flickr - and add your own photos there too. http://www.flickr.com/groups/selfsufficientish/

User avatar
glenniedragon
A selfsufficientish Regular
Posts: 699
Joined: Mon Jan 23, 2006 1:53 pm
Location: Wellington, South West UK
Contact:

Post: # 16388Post glenniedragon »

Yes the bulb is the source of heat. I was surprised how hot it actually got!

Unfortunately the eggs we put in didn't hatch, Eggs were turned, temp was OK, ?Humidity I'll need to tinker a bit..... when OH did the postmortem on the eggs there was no development at all so there is some doubt over the fertility of the eggs -they did come from ebay so that is possible. Now trying some eggs from a local breeder so we'll see how we go (due April 6th)

If they dont, back to the drawing board......
Kind thoughts
Deb

Shirley
A selfsufficientish Regular
Posts: 7025
Joined: Fri Sep 30, 2005 9:05 am
Location: Manchester
Contact:

Post: # 16391Post Shirley »

good luck with your next batch!!!!

did you give the ebay eggs time to settle before putting them into the incubator?? If there was no development at all it points more to the non-fertility of the eggs.. (what is the sellers feedback like??)

Have you candled the eggs at all??
Shirley
NEEPS! North East Eco People's Site

My photos on Flickr

Don't forget to check out the Ish gallery on Flickr - and add your own photos there too. http://www.flickr.com/groups/selfsufficientish/

Wombat
Site Admin
Site Admin
Posts: 5918
Joined: Tue Nov 23, 2004 8:23 pm
Location: Sydney Australia
Contact:

Post: # 16450Post Wombat »

Good luck Deb,

I gotta try that myself one of these days!

Nev
Garden shed technology rules! - Muddypause


Our website on living more sustainably in the suburbs! - http://www.underthechokotree.com/

User avatar
glenniedragon
A selfsufficientish Regular
Posts: 699
Joined: Mon Jan 23, 2006 1:53 pm
Location: Wellington, South West UK
Contact:

Post: # 16499Post glenniedragon »

His feedback was OK, and I left them for 24 hours so maybe early season or something. I haven't candled this next lot-making one of those will be my next project!
Have you hatched any from 'posted' eggs?

kind thoughts
Deb

User avatar
Boots
A selfsufficientish Regular
Posts: 1172
Joined: Thu Dec 29, 2005 2:23 pm
Location: The Queensland, Australia.

Post: # 16500Post Boots »

Hey Deb,
We hatch in a home made incubator too! Ours is an old fridge converted with a waterbed heater.

Here's a few tricks we have picked up through trial and error.

You must have a tray of water beneath your eggs that is topped up regularly...You may be able to fit an old baking tray in there? Chook eggs more than duck eggs need a higher humid environment. Another alternative is to actually spray with a mist spray bottle... but not sure if that would be a good idea in a small incubator...

Turn your eggs at least every 4 hours. I do a late turn before bed and the girls turn again first thing on the way to loo in the morning (which sometimes means 6 hours...). Mark your eggs so you can turn them left to right and then front to back at each turn.

Candling is very easy and your munchkins will love it. Get a small solid cardboard box and seal it right up. Push a pen through one end and cut a globe size hole in the other. Put the box over a bare bulb and you can look into the egg by holding it over the pen hole. It directs light through the shell and gives you a movie show of what's happening inside! If the egg is fertilised, you will see a dark dot which you and your kids can continue to watch grow on a weekly basis. Candling doesn't hurt the embryo, and is a great way to monitor progress. And it saves any explosions that can result from not checking... :pale: This is also a good way of checking the eggs you buy as fertilised ARE actually fertilised!

The shell quality and egg shape is a good sign of hatching potential. Always choose well formed eggs. Ditch any crazed or warty eggs and when the shells begin to thin (as in old layers) they are less likely to make it through the assisted incubation process.

Hope some of that helps. A good incubator strike rate is usually about 75%, but hey - I'm happy with 50! The only funny thing about mine, is they rarely ever hatch together. They tend to begin hatching and slowly hatch over a week to ten days... no idea why that is, as they don't do that under their ma, but they still come. Just have to keep your eye out for the week, as they keep popping out!

User avatar
glenniedragon
A selfsufficientish Regular
Posts: 699
Joined: Mon Jan 23, 2006 1:53 pm
Location: Wellington, South West UK
Contact:

Post: # 16505Post glenniedragon »

Thanks for the instructions Boots!....I can feel a hunt for cardbord boxes coming on!

thanks again
Kind thoughts
Deb

User avatar
glenniedragon
A selfsufficientish Regular
Posts: 699
Joined: Mon Jan 23, 2006 1:53 pm
Location: Wellington, South West UK
Contact:

Post: # 16506Post glenniedragon »

Thanks for the instructions Boots!....I can feel a hunt for cardbord boxes coming on!

thanks again
Kind thoughts
Deb

Post Reply