I maintain a sort of "running commentary" on our garden efforts. I thought I might copy some of it here to compare / contrast with how others do it.
Anyway...lets add some pictures of our efforts to build a self sustaining homestead. We have been in this place for two years. First year was restoring the house. Last Spring we started on the gardens in earnest.
Making the Beds...our journey to a veg patch (picture heavy)
-
British Red
- Barbara Good

- Posts: 111
- Joined: Sat Jan 12, 2008 9:27 pm
- Location: Mercia
Making the Beds...our journey to a veg patch (picture heavy)
Com on wanre niht scriðan sceadugenga
-
British Red
- Barbara Good
- Posts: 111
- Joined: Sat Jan 12, 2008 9:27 pm
- Location: Mercia
Re: Making the Beds...our journey to a veg patch (picture he
I wanted to make this post as part of the ongoing record of our work to move towards our self supporting life. I hope it might make some interesting reading showing what went well and what didn't in this phase of our journey. We have always wanted to produce more of our own food. This cottage came with a small paddock “ one of the reasons we bought it. We have established some gooseberry and rhubarb beds and put in about 14 fruit and nut trees. Now was the time to start on our vegetable beds.
When we moved in the paddock was...just a little overgrown.
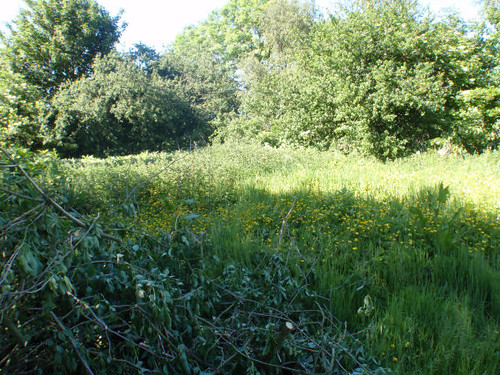
Problem Paddock by British Red, on Flickr
With a lot of work we achieved a “blank canvasâ€
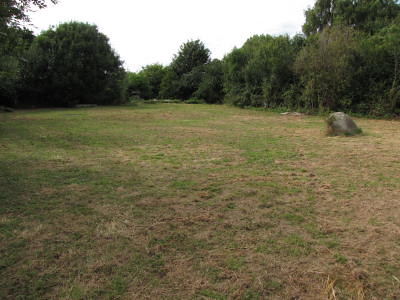
The Paddock now by British Red, on Flickr
Then we had to dig it all up again to put in field drains and a new septic tank and soakaway
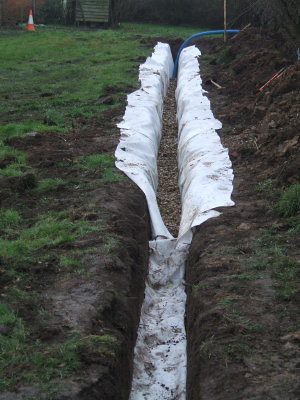
Field Drain 3 by British Red, on Flickr
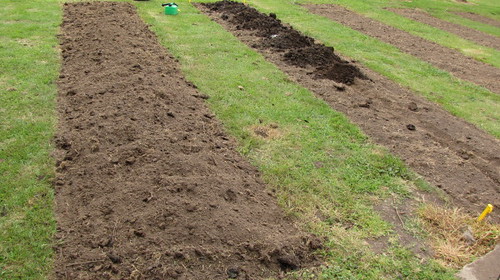
Then we re-seeded the paddock, mowed, cut back etc. Which got us to this
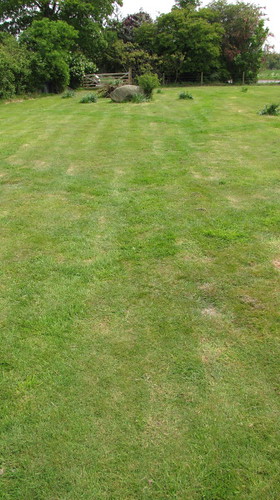
VB 1 - The Paddock by British Red, on Flickr
Lessons Learned:
Don't mess about laying out a garden until you have finished all drainage and utility work. No point digging things up twice or tidying twice.
With big work, use big tools. You can save time and money.
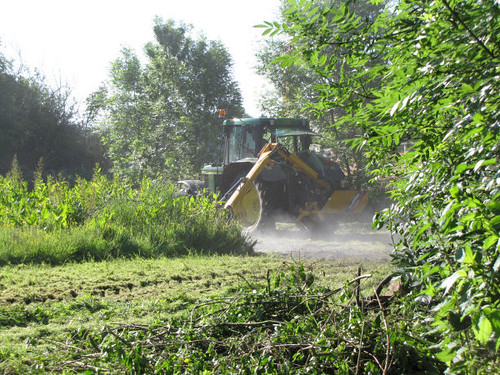
Thats the way to do it by British Red, on Flickr
Now, we have put in and planted vegetable beds in the past. But we have never had the luxury of a completely Blank Canvas. We have read many books during our thirty years of gardening and we did want to incorporate several principles:
1) Have a planned rotation cycle to use nitrogen fixing plants, deep rooted and leafy plants to make the most of the soil in a sustainable way
2) To use narrow, long beds with walkways in between. The purpose of this is so that the beds are never stepped on (and the soil compressed) for weeding, planting or harvesting. The centre of a four foot wide bed is only an arms length from one side or the other.
3) To edge the beds to contain the soil. We worked our last veg beds for seven years, adding manure and compost every year. The height was considerably raised.
4) To leave room in the initial construction to work in more organic material for several years.
5) To standardise our bed size. This lets us build cloches, bird and butterfly cages etc. that can be moved from bed to bed as needed.
We decided to standardise on beds of wide by long (as discussed in the seminal work of John Seymour in The Self Sufficient Gardener.
The next thing we wanted to know was which side of the paddock faced South
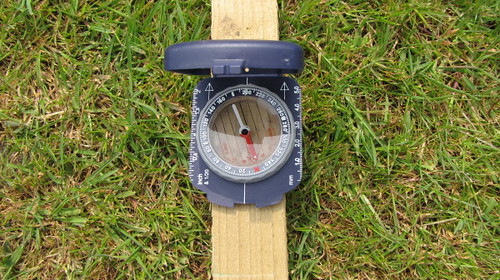
VB 2 Check South by British Red, on Flickr
The right hand side of this picture faces almost due South
VB 1 - The Paddock by British Red, on Flickr
I'm sure everyone knows this, but the South side of any plot gets the most sun.
We planned to put in five beds each of 100 square feet as our initial development and then add more in similar sized batches of beds. This led us to a question. Should we put the wide side of one bed on the South side of the paddock and then add more beds behind it? This would allow us to put low growing crops to the South and then put successively higher plants (sweetcorn, beans etc.) behind them. This seemed fine, until we realised that we wanted to rotate the beds each year. Putting the wide side to the South would mean that, eventually, tall plants would be on the South and therefore shade out lower growing plants. We settled on aligning the beds North to South. This allows us to have tall crops in any bed without shading out the rest of the beds.
Lesson Learned.
Ensure that your plan permits the maximum flexibility of moving different types of crop around before committing.
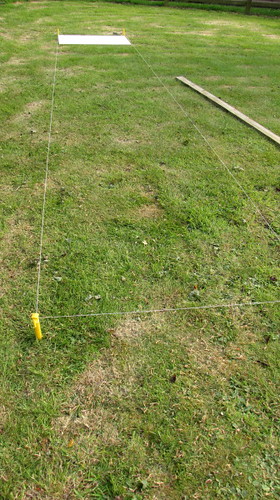
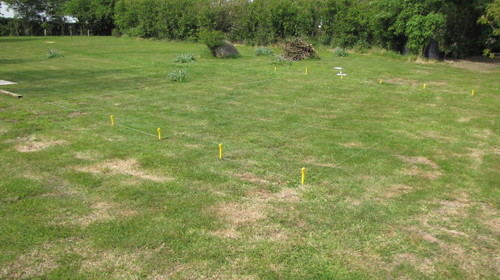
So enough thinking. Time to start pegging out the beds.
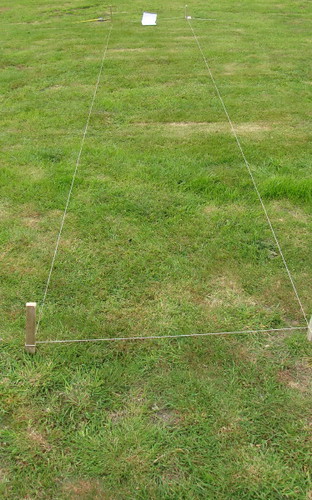
VB 3 Peg Out by British Red, on Flickr
There we go. Looks neat huh? We even calculated the “corner to corner measurement†to ensure they were square (hence the notepad. You will need one).
Lesson Learned:
You will need more than one tape measure. You will also need a looong tape. I borrowed a surveyors tape (100ft), from a neighbour. It was an old one (feet and inches). Timber is only sold in metres now so the notepad had the measurements in both.
At this point I got very p***ed off. I could not get the beds both square and aligned. I also realised we had started in the easiest place. This is also known as the wrong place.
Lessons Learned:
Consider where your water and compost is / will be when locating your veg beds. You do NOT want to barrow tons of compost or move gallons of water further than you need to.
Big wooden pegs and are useless of pegging out. If the peg is an inch wide, the string can move by an inch on the peg ruining you measurements.
All the pegs were removed at this point and I went digging for old tent pegs. I also went into the barn of much left over stuff. Looking for wood. I found a long baulk of timber and a half sheet or plywood.
BB had a stroke of genius at this point and did some research. The type of timber we wanted to make the bed edges came in metric sizes. Basically it was available in multiples of 1.2m. We settled on beds that were 1.2m by 7.6m (roughly 4 by 25).
Lesson Learned:
Size your beds to the material available (or sensible fractions and multiples of them).
What we also did next was work out how wide the paths had to be. As a minimum, we nedded to be able to kneel comfortably between the beds this implied about a 3 width. Again BB's brain helped. She measured the width of our ride on mower and added a few inches. Interestingly this made the paths the same width as the beds (1.2m).
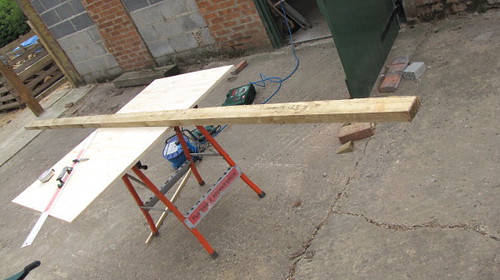
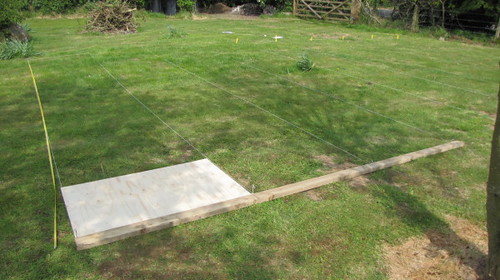
I cut the plywood off cut to exactly 1.2 across by 60cm long. This would let us lay out both pegs at one end of a bed and check the sides were parallel. I marked the long timber baulk up to show 1.2m, 2.4m and 3.6m. This would let us check that two beds and the path between them were perfectly aligned to one another.
VB 6 Width board and length board by British Red, on Flickr
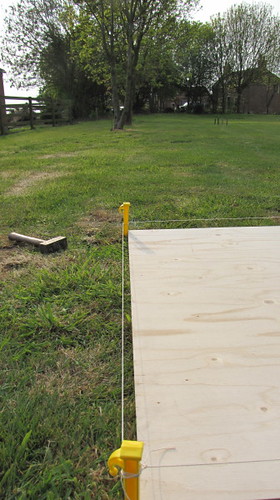
We started properly this time. We picked a key peg and measured a mowers width from the barbed wire fence at one end of the paddock.
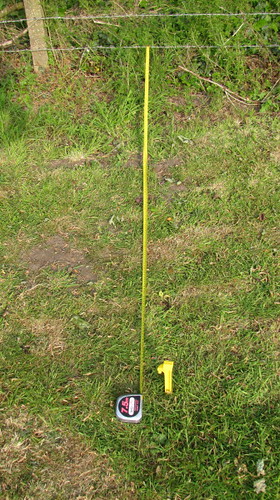
VB 7 - Key off fence by British Red, on Flickr
We measured a second parallel peg from the same fence
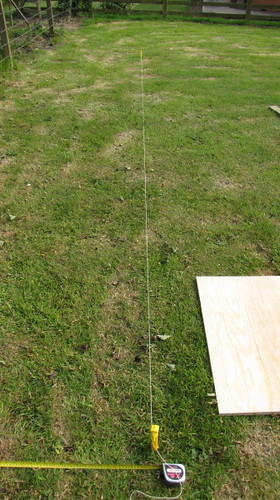
VB 8 - First Length by British Red, on Flickr
Using the ply board, we set out the other side of the bed
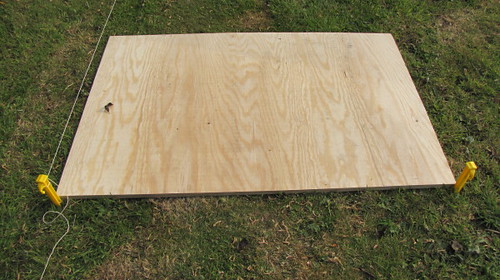
VB 9 Width Board by British Red, on Flickr
VB 10 Square by British Red, on Flickr
Then, as we were getting used to, we had an sh**t moment. The paddock is not square. If we continued pegging out the beds parallel – we would run into the line of wind break ash trees.
VB 11 - Trees in way by British Red, on Flickr
So we unpegged it all and aligned down the sides of the trees (ensuring at least a mowers width at the fence end).
Lesson Learned:
Its a pain to move pegs but one heck of a lot easier than moving the beds!
Having pegged out the first bed that finally looked okay, the timber baulk came into play to align one bed to the path beside it and the next bed.
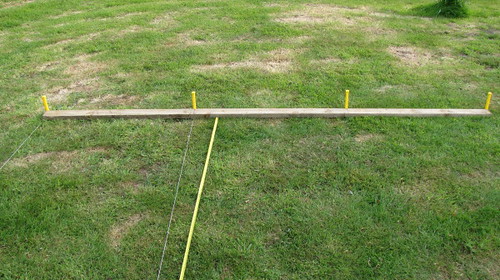
VB12 Beds and Paths by British Red, on Flickr
This gave us squarely aligned beds
VB 13 Parallel Beds by British Red, on Flickr
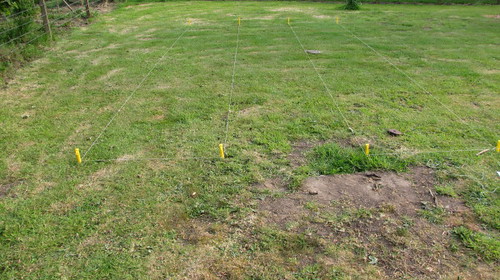
We continued using the board and timber baulk to align subsequent beds
VB 14 Both Boards by British Red, on Flickr
Eventually we had pegged out our five initial beds
VB 15 Line of Beds by British Red, on Flickr
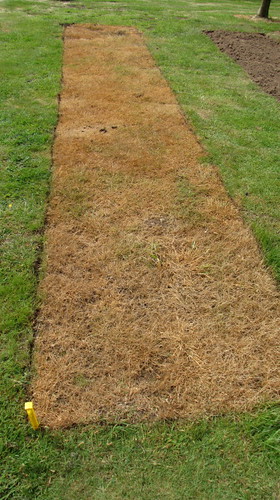
Nest we had to remove the turf. I wanted to use a turf cutter or even a spade to cut the turf. We had had no rain in nine weeks at this point. I could rest my entire weight on a sharpened spade and not get it in more than half an inch. Cutting turf just wasn't feasible. I used a fast breakdown weed killer to kill the grass off as a result.
Lesson Learned:
Cut beds in the Winter when the ground is wet and soft.
After a spray and a few days we had this

VB 16 Grass Killed by British Red, on Flickr
Once the grass was dead, we set to with cutting in. Tools used were a lawn edger, sharp spade, soil rake and yard brush.
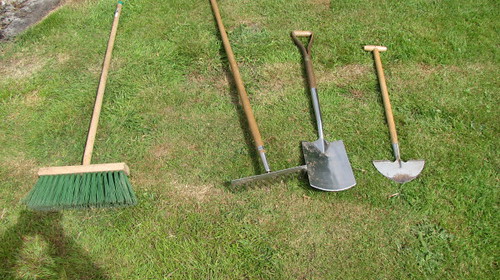
VB 17 Tools by British Red, on Flickr
First the lawn edger was run down the string and stamped in to cut the turf.
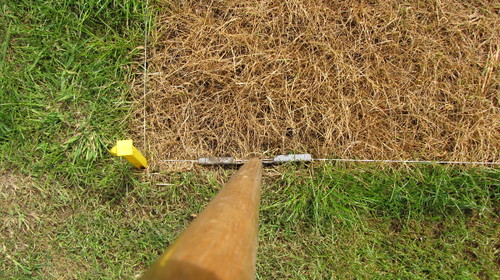
VB 19 Follow String by British Red, on Flickr
The string was removed when the bed was cut all the way around
VB 20 String off by British Red, on Flickr
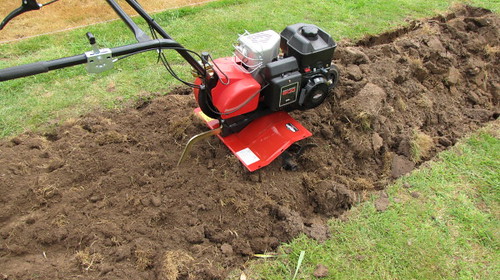
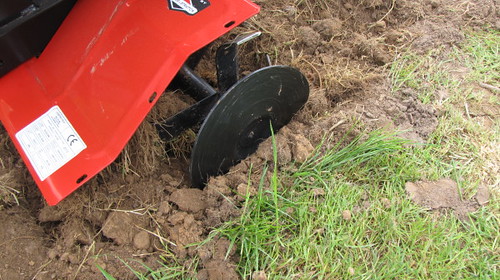
Then I wheeled out the rotovator. These can be hired, but we intend to have a fair sized number of beds so have invested in our own.

VB 21 Rotovator by British Red, on Flickr
The dead grass was rotovated under, paying particular attention to get the rotovator deeply in to the middle of the bed
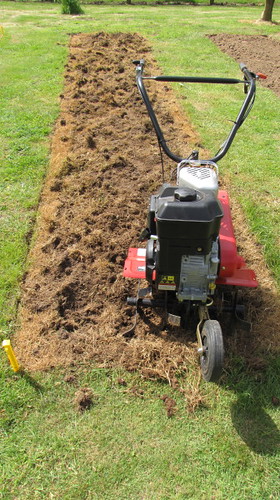
VB 22 Rotovate Middle by British Red, on Flickr
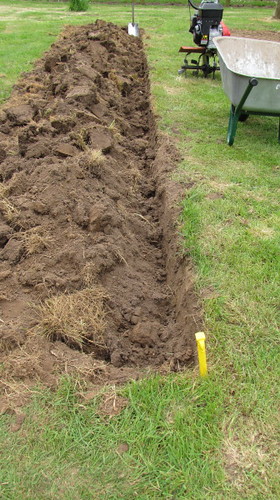
To ensure the soil was uniformly broken to a fine tilth, I hand dug the edges of the bed
VB 23 Dig edges by British Red, on Flickr
The soil was mounded up in the middle
VB 24 Pile Up soil by British Red, on Flickr
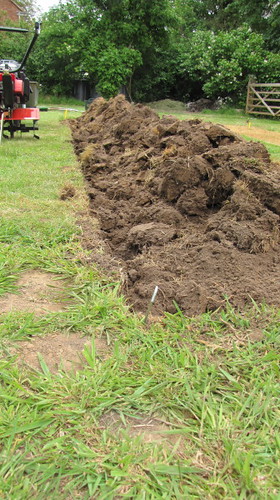
The mounded up soil from the sides was then rotovated reducing the large clumps to a fine tilth and forcing that tilth back into the trench.
VB 25 Rotovate Pile by British Red, on Flickr
Lessons Learned:
Buy a rotovator where the handles can be offset, allowing you to rotovate whilst walking on the path
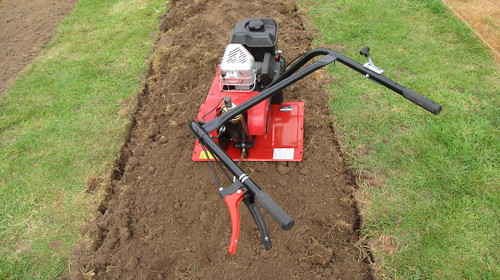
VB 26 Offset Handles by British Red, on Flickr
Buy a rotovator with a reverse gear (red handle) so you can go over the same ground repeatedly and turn the rotovator without hauling it round by brute force.
Next I wanted to ensure I had got as deep as possible turning the soil at the edge of the beds. This is tricky with the normal tines as they are a bent x shape and its hard to see the edge when moving
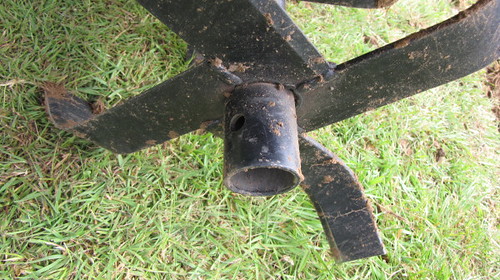
VB 27 Tines by British Red, on Flickr
Fortunately I have edge guards which can be fitted to the blades
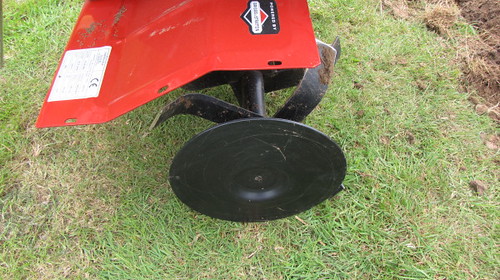
VB 28 Edge Protector by British Red, on Flickr
The edge guards can be pressed against the cut edge of the bed to ensure the rotovator is getting right to the edge without tearing up the path
VB 29 Edges by British Red, on Flickr
You can see though that some tilled earth does spill out on the path. The timber edging will solve this in due course.
The beds ended up looking like this
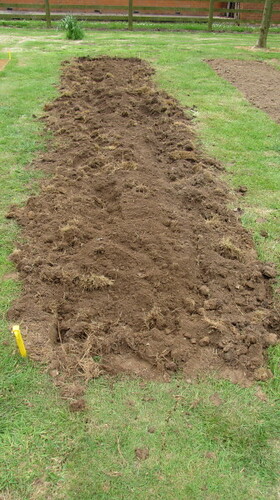
VB 30 Rotovated by British Red, on Flickr
The first job was to use the yard brush to sweep the soil back into the bed

VB 31 Swept In by British Red, on Flickr
Then the soil rake was used to remove dead grass and stones

VB 32 Raked by British Red, on Flickr
Next job was to improve the soil. Last year my horse keeping neighbour dropped a few JCB buckets of horse manure round for me into my compost area. I layered it with grass clippings and wood ash from the stoves, covered in heavy polythene and rotted it down.
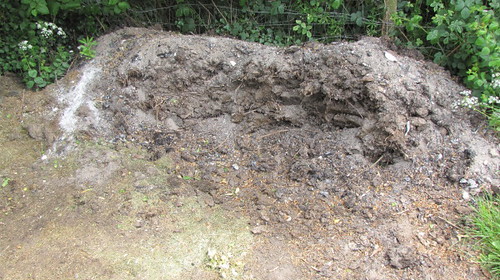
VB 33 Muck Heap by British Red, on Flickr
I had about three tonnes left for these five beds so I dug it out by hand and barrowed it on.
VB 35 Rake Out Muck by British Red, on Flickr
Lesson Learned:
When a kind neighbour offers you their mini digger, accept with thanks!
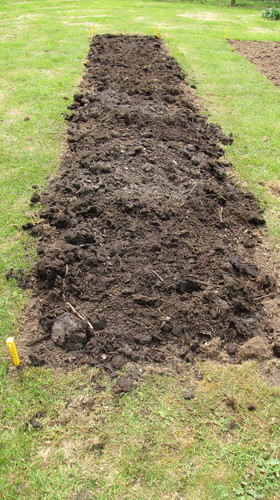
The muck was then rotovated in and the soil reduced to a seed bed.
VB 36 Rotovate Muck In by British Red, on Flickr
The soil was pretty much ready so it was time to buy the edge timber. I looked at all the chain store stuff. It was expensive and, frankly, rubbish. Enter BB again. “What about that local firm that supplied our gateposts and fencing she asked? They are a few miles away so we shot round to see the guy. He remembered BB.
Lesson Learned:
Let the pretty willowy girl get the prices
The guy asked what we wanted. 300 board feet of pressure treated 6 x 1 timber. Plus a load of 2x 2 stakes
Did I mind long lengths? Did I mind slight off true timber?
No to both. A cash deal was done for really thick strong decking timber that was slightly warped in pressure treating so not quite right for decking (maybe 1 off in 12). Easy enough to stake it straight enough for our purposes though. The guy delivered it free the next day
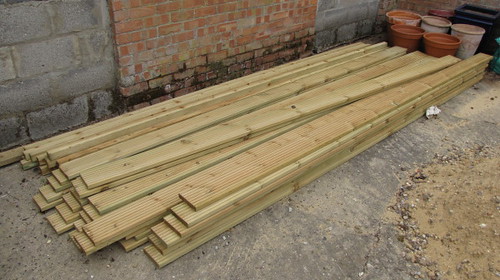
VB 36 Timber by British Red, on Flickr
(apologies for the messy yard, the ballast shown is for mixing concrete for another project)
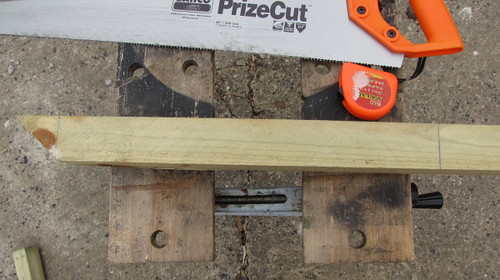
Next job was to cut the timber to size. With long lengths of timber you really need two saw benches. Other tools used were a steel rule, steel tape, carpenters pencil and panel saw.
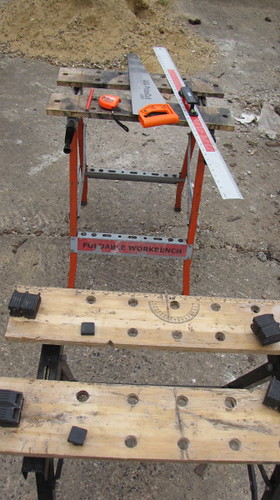
VB 37 Tools by British Red, on Flickr
The first thing I did was to cut 50 stakes (each 18 long). Given I had very long length of 2x2 timber, I cut a 45 degree angle which formed points for two different stakes
VB 38 Marking Points by British Red, on Flickr
Each alternate cut was at 45 degrees and ninety degrees this gave a sharpened stake
VB 39 Point cut by British Red, on Flickr
The planks were 3.6m long (just under 12). We made the beds 1.2m wide so one long plank could be converted to three end pieces. The beds were 7.2m long so exactly two planks long
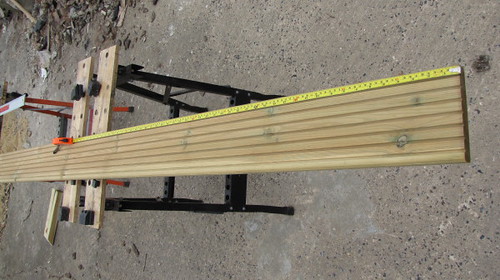
VB 40 Measure small Sides by British Red, on Flickr
Given the planks were 6 wide, the stakes would go about a foot into the earth for support.
VB 41 Size of pegs by British Red, on Flickr
Having cut planks and stakes, I got wheelbarrow full of bricks
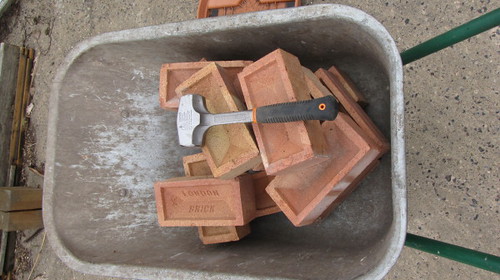
VB 42 Support Bricks by British Red, on Flickr
This was so that we could prop up the planks in place prior to hammering in the stakes
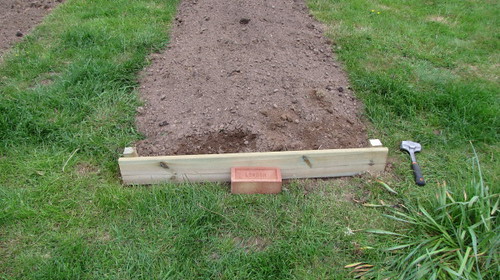
VB 43 First End by British Red, on Flickr
Once one end was staked, the rest of the planks could be propped in place then staked
VB 44 Sides "Offered Up" by British Red, on Flickr
Lesson Learned:
I thought a 4lb brick hammer would be enough to drive the stakes. The ground was so hard that I switched to using a 10lb sledge hammer. Again, do this when the ground is soft!
Having staked the whole bed (and when my hands stopped vibrating!) the planks were screwed to the stakes with 3 anti corrosion deck screws. A battery drill to make pilot holes and a battery driver speeded this part up immensely over using a brace and bit and hand screwdriver.
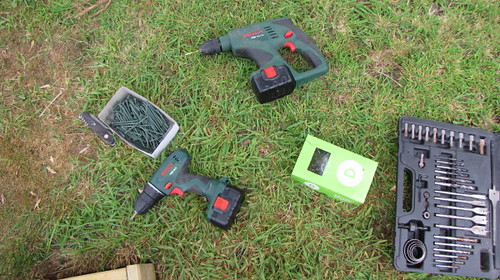
VB 45 Drill, Driver and Deck Screws by British Red, on Flickr
Lesson Learned:
Battery powered tools (or petrol powered) are far more useful round the homestead than anything tied to the mains and far quicker than hand tools.
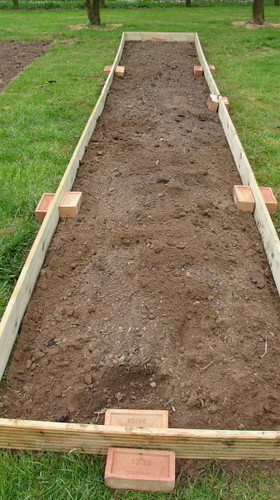
When the first bed was complete it looked like this
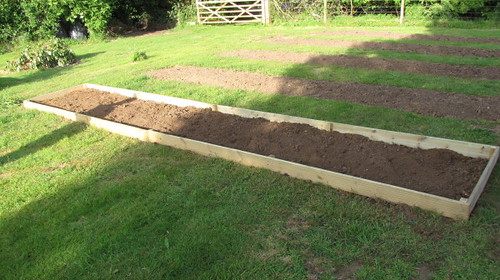
VB 47 Bed 1 complete by British Red, on Flickr
Rinse and repeat four more times for our first bank of five beds
vb 48 All the beds by British Red, on Flickr
Overall, my critical lessons are:
1) Do it when the ground is soft
2) Spend plenty of time planning and marking out. Consider the sun, water, overall garden plan and the position of drains, trees and shade.
3) A few powered tools make a heck of a difference.
4) You cannot have enough manure and compost.
5) Size your beds to a fraction or multiple of the available materials
6) Do it when the ground is soft!!!!!!
Hope my mistakes and lessons help the next person who is planning such a task!
Red
When we moved in the paddock was...just a little overgrown.
Problem Paddock by British Red, on Flickr
With a lot of work we achieved a “blank canvasâ€
The Paddock now by British Red, on Flickr
Then we had to dig it all up again to put in field drains and a new septic tank and soakaway
Field Drain 3 by British Red, on Flickr
Then we re-seeded the paddock, mowed, cut back etc. Which got us to this
VB 1 - The Paddock by British Red, on Flickr
Lessons Learned:
Don't mess about laying out a garden until you have finished all drainage and utility work. No point digging things up twice or tidying twice.
With big work, use big tools. You can save time and money.
Thats the way to do it by British Red, on Flickr
Now, we have put in and planted vegetable beds in the past. But we have never had the luxury of a completely Blank Canvas. We have read many books during our thirty years of gardening and we did want to incorporate several principles:
1) Have a planned rotation cycle to use nitrogen fixing plants, deep rooted and leafy plants to make the most of the soil in a sustainable way
2) To use narrow, long beds with walkways in between. The purpose of this is so that the beds are never stepped on (and the soil compressed) for weeding, planting or harvesting. The centre of a four foot wide bed is only an arms length from one side or the other.
3) To edge the beds to contain the soil. We worked our last veg beds for seven years, adding manure and compost every year. The height was considerably raised.
4) To leave room in the initial construction to work in more organic material for several years.
5) To standardise our bed size. This lets us build cloches, bird and butterfly cages etc. that can be moved from bed to bed as needed.
We decided to standardise on beds of wide by long (as discussed in the seminal work of John Seymour in The Self Sufficient Gardener.
The next thing we wanted to know was which side of the paddock faced South
VB 2 Check South by British Red, on Flickr
The right hand side of this picture faces almost due South
VB 1 - The Paddock by British Red, on Flickr
I'm sure everyone knows this, but the South side of any plot gets the most sun.
We planned to put in five beds each of 100 square feet as our initial development and then add more in similar sized batches of beds. This led us to a question. Should we put the wide side of one bed on the South side of the paddock and then add more beds behind it? This would allow us to put low growing crops to the South and then put successively higher plants (sweetcorn, beans etc.) behind them. This seemed fine, until we realised that we wanted to rotate the beds each year. Putting the wide side to the South would mean that, eventually, tall plants would be on the South and therefore shade out lower growing plants. We settled on aligning the beds North to South. This allows us to have tall crops in any bed without shading out the rest of the beds.
Lesson Learned.
Ensure that your plan permits the maximum flexibility of moving different types of crop around before committing.
So enough thinking. Time to start pegging out the beds.
VB 3 Peg Out by British Red, on Flickr
There we go. Looks neat huh? We even calculated the “corner to corner measurement†to ensure they were square (hence the notepad. You will need one).
Lesson Learned:
You will need more than one tape measure. You will also need a looong tape. I borrowed a surveyors tape (100ft), from a neighbour. It was an old one (feet and inches). Timber is only sold in metres now so the notepad had the measurements in both.
At this point I got very p***ed off. I could not get the beds both square and aligned. I also realised we had started in the easiest place. This is also known as the wrong place.
Lessons Learned:
Consider where your water and compost is / will be when locating your veg beds. You do NOT want to barrow tons of compost or move gallons of water further than you need to.
Big wooden pegs and are useless of pegging out. If the peg is an inch wide, the string can move by an inch on the peg ruining you measurements.
All the pegs were removed at this point and I went digging for old tent pegs. I also went into the barn of much left over stuff. Looking for wood. I found a long baulk of timber and a half sheet or plywood.
BB had a stroke of genius at this point and did some research. The type of timber we wanted to make the bed edges came in metric sizes. Basically it was available in multiples of 1.2m. We settled on beds that were 1.2m by 7.6m (roughly 4 by 25).
Lesson Learned:
Size your beds to the material available (or sensible fractions and multiples of them).
What we also did next was work out how wide the paths had to be. As a minimum, we nedded to be able to kneel comfortably between the beds this implied about a 3 width. Again BB's brain helped. She measured the width of our ride on mower and added a few inches. Interestingly this made the paths the same width as the beds (1.2m).
I cut the plywood off cut to exactly 1.2 across by 60cm long. This would let us lay out both pegs at one end of a bed and check the sides were parallel. I marked the long timber baulk up to show 1.2m, 2.4m and 3.6m. This would let us check that two beds and the path between them were perfectly aligned to one another.
VB 6 Width board and length board by British Red, on Flickr
We started properly this time. We picked a key peg and measured a mowers width from the barbed wire fence at one end of the paddock.
VB 7 - Key off fence by British Red, on Flickr
We measured a second parallel peg from the same fence
VB 8 - First Length by British Red, on Flickr
Using the ply board, we set out the other side of the bed
VB 9 Width Board by British Red, on Flickr
VB 10 Square by British Red, on Flickr
Then, as we were getting used to, we had an sh**t moment. The paddock is not square. If we continued pegging out the beds parallel – we would run into the line of wind break ash trees.
VB 11 - Trees in way by British Red, on Flickr
So we unpegged it all and aligned down the sides of the trees (ensuring at least a mowers width at the fence end).
Lesson Learned:
Its a pain to move pegs but one heck of a lot easier than moving the beds!
Having pegged out the first bed that finally looked okay, the timber baulk came into play to align one bed to the path beside it and the next bed.
VB12 Beds and Paths by British Red, on Flickr
This gave us squarely aligned beds
VB 13 Parallel Beds by British Red, on Flickr
We continued using the board and timber baulk to align subsequent beds
VB 14 Both Boards by British Red, on Flickr
Eventually we had pegged out our five initial beds
VB 15 Line of Beds by British Red, on Flickr
Nest we had to remove the turf. I wanted to use a turf cutter or even a spade to cut the turf. We had had no rain in nine weeks at this point. I could rest my entire weight on a sharpened spade and not get it in more than half an inch. Cutting turf just wasn't feasible. I used a fast breakdown weed killer to kill the grass off as a result.
Lesson Learned:
Cut beds in the Winter when the ground is wet and soft.
After a spray and a few days we had this
VB 16 Grass Killed by British Red, on Flickr
Once the grass was dead, we set to with cutting in. Tools used were a lawn edger, sharp spade, soil rake and yard brush.
VB 17 Tools by British Red, on Flickr
First the lawn edger was run down the string and stamped in to cut the turf.
VB 19 Follow String by British Red, on Flickr
The string was removed when the bed was cut all the way around
VB 20 String off by British Red, on Flickr
Then I wheeled out the rotovator. These can be hired, but we intend to have a fair sized number of beds so have invested in our own.
VB 21 Rotovator by British Red, on Flickr
The dead grass was rotovated under, paying particular attention to get the rotovator deeply in to the middle of the bed
VB 22 Rotovate Middle by British Red, on Flickr
To ensure the soil was uniformly broken to a fine tilth, I hand dug the edges of the bed
VB 23 Dig edges by British Red, on Flickr
The soil was mounded up in the middle
VB 24 Pile Up soil by British Red, on Flickr
The mounded up soil from the sides was then rotovated reducing the large clumps to a fine tilth and forcing that tilth back into the trench.
VB 25 Rotovate Pile by British Red, on Flickr
Lessons Learned:
Buy a rotovator where the handles can be offset, allowing you to rotovate whilst walking on the path
VB 26 Offset Handles by British Red, on Flickr
Buy a rotovator with a reverse gear (red handle) so you can go over the same ground repeatedly and turn the rotovator without hauling it round by brute force.
Next I wanted to ensure I had got as deep as possible turning the soil at the edge of the beds. This is tricky with the normal tines as they are a bent x shape and its hard to see the edge when moving
VB 27 Tines by British Red, on Flickr
Fortunately I have edge guards which can be fitted to the blades
VB 28 Edge Protector by British Red, on Flickr
The edge guards can be pressed against the cut edge of the bed to ensure the rotovator is getting right to the edge without tearing up the path
VB 29 Edges by British Red, on Flickr
You can see though that some tilled earth does spill out on the path. The timber edging will solve this in due course.
The beds ended up looking like this
VB 30 Rotovated by British Red, on Flickr
The first job was to use the yard brush to sweep the soil back into the bed
VB 31 Swept In by British Red, on Flickr
Then the soil rake was used to remove dead grass and stones
VB 32 Raked by British Red, on Flickr
Next job was to improve the soil. Last year my horse keeping neighbour dropped a few JCB buckets of horse manure round for me into my compost area. I layered it with grass clippings and wood ash from the stoves, covered in heavy polythene and rotted it down.
VB 33 Muck Heap by British Red, on Flickr
I had about three tonnes left for these five beds so I dug it out by hand and barrowed it on.
VB 35 Rake Out Muck by British Red, on Flickr
Lesson Learned:
When a kind neighbour offers you their mini digger, accept with thanks!
The muck was then rotovated in and the soil reduced to a seed bed.
VB 36 Rotovate Muck In by British Red, on Flickr
The soil was pretty much ready so it was time to buy the edge timber. I looked at all the chain store stuff. It was expensive and, frankly, rubbish. Enter BB again. “What about that local firm that supplied our gateposts and fencing she asked? They are a few miles away so we shot round to see the guy. He remembered BB.
Lesson Learned:
Let the pretty willowy girl get the prices
The guy asked what we wanted. 300 board feet of pressure treated 6 x 1 timber. Plus a load of 2x 2 stakes
Did I mind long lengths? Did I mind slight off true timber?
No to both. A cash deal was done for really thick strong decking timber that was slightly warped in pressure treating so not quite right for decking (maybe 1 off in 12). Easy enough to stake it straight enough for our purposes though. The guy delivered it free the next day
VB 36 Timber by British Red, on Flickr
(apologies for the messy yard, the ballast shown is for mixing concrete for another project)
Next job was to cut the timber to size. With long lengths of timber you really need two saw benches. Other tools used were a steel rule, steel tape, carpenters pencil and panel saw.
VB 37 Tools by British Red, on Flickr
The first thing I did was to cut 50 stakes (each 18 long). Given I had very long length of 2x2 timber, I cut a 45 degree angle which formed points for two different stakes
VB 38 Marking Points by British Red, on Flickr
Each alternate cut was at 45 degrees and ninety degrees this gave a sharpened stake
VB 39 Point cut by British Red, on Flickr
The planks were 3.6m long (just under 12). We made the beds 1.2m wide so one long plank could be converted to three end pieces. The beds were 7.2m long so exactly two planks long
VB 40 Measure small Sides by British Red, on Flickr
Given the planks were 6 wide, the stakes would go about a foot into the earth for support.
VB 41 Size of pegs by British Red, on Flickr
Having cut planks and stakes, I got wheelbarrow full of bricks
VB 42 Support Bricks by British Red, on Flickr
This was so that we could prop up the planks in place prior to hammering in the stakes
VB 43 First End by British Red, on Flickr
Once one end was staked, the rest of the planks could be propped in place then staked
VB 44 Sides "Offered Up" by British Red, on Flickr
Lesson Learned:
I thought a 4lb brick hammer would be enough to drive the stakes. The ground was so hard that I switched to using a 10lb sledge hammer. Again, do this when the ground is soft!
Having staked the whole bed (and when my hands stopped vibrating!) the planks were screwed to the stakes with 3 anti corrosion deck screws. A battery drill to make pilot holes and a battery driver speeded this part up immensely over using a brace and bit and hand screwdriver.
VB 45 Drill, Driver and Deck Screws by British Red, on Flickr
Lesson Learned:
Battery powered tools (or petrol powered) are far more useful round the homestead than anything tied to the mains and far quicker than hand tools.
When the first bed was complete it looked like this
VB 47 Bed 1 complete by British Red, on Flickr
Rinse and repeat four more times for our first bank of five beds
vb 48 All the beds by British Red, on Flickr
Overall, my critical lessons are:
1) Do it when the ground is soft
2) Spend plenty of time planning and marking out. Consider the sun, water, overall garden plan and the position of drains, trees and shade.
3) A few powered tools make a heck of a difference.
4) You cannot have enough manure and compost.
5) Size your beds to a fraction or multiple of the available materials
6) Do it when the ground is soft!!!!!!
Hope my mistakes and lessons help the next person who is planning such a task!
Red
Com on wanre niht scriðan sceadugenga
-
British Red
- Barbara Good
- Posts: 111
- Joined: Sat Jan 12, 2008 9:27 pm
- Location: Mercia
Re: Making the Beds...our journey to a veg patch (picture he
We decided we wanted a decent amount of "glass house" space at the homestead. There were a number of reasons for this:
1) To provide early germination of seeds for our veg beds.
2) To grow tender plants that do not do well "outdoors"
3) To extend the growing season
4) To provide protection from airborne problems such as blight.
When we moved in there was an area that had once held glass houses but that, more recently, had been used in a rather poor way to house chickens. An amateurishly converted shed was on that spot, infested with red spider mite, wet rot and wood worm. One of my first jobs was to demolish and burn this "disease hotel"
The old "brownfield" plot became a general area for compost bins, manure, woodchip etc.

Greenhouse 1 by British Red, on Flickr
Eventually the time came to position the new greenhouses. The site was perfect – an open Southerly aspect, close to our water and power. So we planned out what we could fit on the site. Two greenhouses of about 8'6" by 10' 6" left a small walkway inside the existing walls for glass cleaning and maintenance.
Once we had established this and ordered the greenhouses, the plot needed to be prepared. The first job was to remove all the old timber and wire work

Greenhouse 2 by British Red, on Flickr
The remaining walls had to be evened and lowered

Greenhouse 3 by British Red, on Flickr
The compost bins and manure were relocated (with a wheelbarrow “note to self" buy a tipper trailer)

Greenhouse 4 by British Red, on Flickr
Starting to level out - deep joy - some old hard standing was found under the soil

Greenhouse 5 by British Red, on Flickr
Breaking out a 6' prybar and fulcrum made short work of those.

Greenhouse 6 by British Red, on Flickr
Beginning to dig over and level the site I was delighted (not) to find an old soak away filled with rammel

Greenhouse 8 by British Red, on Flickr
After digging further test pits to check for other hard core, the site was levelled and raked.

Greenhouse 9 by British Red, on Flickr
After checking and double checking the exact dimensions of the greenhouses, footing trenches were dug 18" deep allowing a 3" internal diameter. A concrete mixer was used to pour foundations.

Greenhouse 10 by British Red, on Flickr

Greenhouse Footings in by British Red, on Flickr
When the footings had "gone off", I hand dug a trench 18" wide by 18" deep around the inside of the footings

Greenhouse trench by British Red, on Flickr
Well rotted manure, compost and topsoil was used to backfill the future greenhouse beds

Greenhouse bed infill by British Red, on Flickr

Greenhouse beds by British Red, on Flickr
The internal footprint of the greenhouses was then levelled off

Greenhouse beds levelled by British Red, on Flickr

Greenhouse flattened by British Red, on Flickr
When the greenhouses turned up, the scary moment was checking the bases fitted on the footings. Thankfully they did!

Greenhouse Bases by British Red, on Flickr
A big day's work saw the basic assembly done

Greenhouse Sides Up by British Red, on Flickr

Greenhouse Doors on by British Red, on Flickr

Greenhouses complete by British Red, on Flickr
The next day I chose to deploy Springer brackets (so named after the man who invented the greenhouse / kite hybrid )

Greenhouse Brackets by British Red, on Flickr

Greenhouse Screw and cup washer by British Red, on Flickr

Greenhouse Small Socket Set by British Red, on Flickr
The last job was to install gutter kits and twin rain butts to give 450 litres (120 gallons) of water harvesting

Greenhouse Water Butts System by British Red, on Flickr
Red
1) To provide early germination of seeds for our veg beds.
2) To grow tender plants that do not do well "outdoors"
3) To extend the growing season
4) To provide protection from airborne problems such as blight.
When we moved in there was an area that had once held glass houses but that, more recently, had been used in a rather poor way to house chickens. An amateurishly converted shed was on that spot, infested with red spider mite, wet rot and wood worm. One of my first jobs was to demolish and burn this "disease hotel"
The old "brownfield" plot became a general area for compost bins, manure, woodchip etc.
Greenhouse 1 by British Red, on Flickr
Eventually the time came to position the new greenhouses. The site was perfect – an open Southerly aspect, close to our water and power. So we planned out what we could fit on the site. Two greenhouses of about 8'6" by 10' 6" left a small walkway inside the existing walls for glass cleaning and maintenance.
Once we had established this and ordered the greenhouses, the plot needed to be prepared. The first job was to remove all the old timber and wire work
Greenhouse 2 by British Red, on Flickr
The remaining walls had to be evened and lowered
Greenhouse 3 by British Red, on Flickr
The compost bins and manure were relocated (with a wheelbarrow “note to self" buy a tipper trailer)
Greenhouse 4 by British Red, on Flickr
Starting to level out - deep joy - some old hard standing was found under the soil
Greenhouse 5 by British Red, on Flickr
Breaking out a 6' prybar and fulcrum made short work of those.
Greenhouse 6 by British Red, on Flickr
Beginning to dig over and level the site I was delighted (not) to find an old soak away filled with rammel
Greenhouse 8 by British Red, on Flickr
After digging further test pits to check for other hard core, the site was levelled and raked.
Greenhouse 9 by British Red, on Flickr
After checking and double checking the exact dimensions of the greenhouses, footing trenches were dug 18" deep allowing a 3" internal diameter. A concrete mixer was used to pour foundations.
Greenhouse 10 by British Red, on Flickr
Greenhouse Footings in by British Red, on Flickr
When the footings had "gone off", I hand dug a trench 18" wide by 18" deep around the inside of the footings
Greenhouse trench by British Red, on Flickr
Well rotted manure, compost and topsoil was used to backfill the future greenhouse beds
Greenhouse bed infill by British Red, on Flickr
Greenhouse beds by British Red, on Flickr
The internal footprint of the greenhouses was then levelled off
Greenhouse beds levelled by British Red, on Flickr
Greenhouse flattened by British Red, on Flickr
When the greenhouses turned up, the scary moment was checking the bases fitted on the footings. Thankfully they did!
Greenhouse Bases by British Red, on Flickr
A big day's work saw the basic assembly done
Greenhouse Sides Up by British Red, on Flickr
Greenhouse Doors on by British Red, on Flickr
Greenhouses complete by British Red, on Flickr
The next day I chose to deploy Springer brackets (so named after the man who invented the greenhouse / kite hybrid )
Greenhouse Brackets by British Red, on Flickr
Greenhouse Screw and cup washer by British Red, on Flickr
Greenhouse Small Socket Set by British Red, on Flickr
The last job was to install gutter kits and twin rain butts to give 450 litres (120 gallons) of water harvesting
Greenhouse Water Butts System by British Red, on Flickr
Red
Com on wanre niht scriðan sceadugenga
-
British Red
- Barbara Good
- Posts: 111
- Joined: Sat Jan 12, 2008 9:27 pm
- Location: Mercia
Re: Making the Beds...our journey to a veg patch (picture he
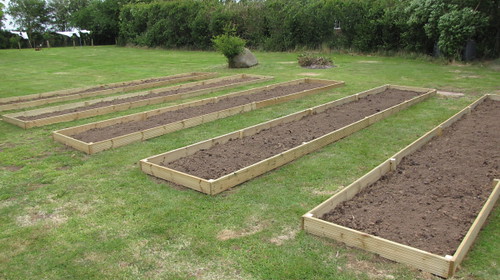
Well, we are up to 10 beds now :)
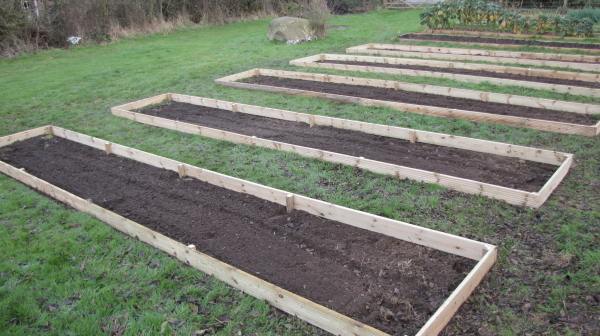
New veg beds by British Red, on Flickr

New veg beds by British Red, on Flickr
That takes us to 1,000 square feet of high quality beds (plus the rhubarb and gooseberry patches)
We have added another bunch of fruit trees as well (more cherries, plums, apples, a green gage and a weeping crap apple for pollination)

New Fruit Trees by British Red, on Flickr
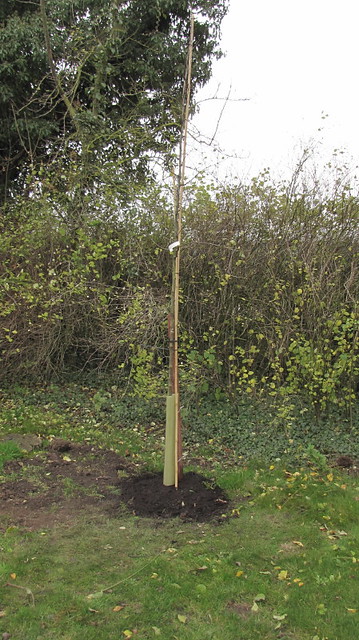
Crab Apple by British Red, on Flickr
That takes us to about twenty fruit and nut trees.
We have a long way to go. But its more than we had last year!
Red
New veg beds by British Red, on Flickr
New veg beds by British Red, on Flickr
That takes us to 1,000 square feet of high quality beds (plus the rhubarb and gooseberry patches)
We have added another bunch of fruit trees as well (more cherries, plums, apples, a green gage and a weeping crap apple for pollination)
New Fruit Trees by British Red, on Flickr
Crab Apple by British Red, on Flickr
That takes us to about twenty fruit and nut trees.
We have a long way to go. But its more than we had last year!
Red
Com on wanre niht scriðan sceadugenga
-
British Red
- Barbara Good
- Posts: 111
- Joined: Sat Jan 12, 2008 9:27 pm
- Location: Mercia
Re: Making the Beds...our journey to a veg patch (picture he
This post is about the next phase of our "standard beds" project. As you may recall, we have standardised our beds to a layout of 25' x 4'. Each bed is therefore 100 square feet. The beds are deeply manured and can be worked from either side (weeded, planted etc.) without having to step on and compress the soil.
Another reason we wanted to "standardise" our beds was that we have realised over the years, that some of our crops need protection or assistance. Some forms of that predation are insects (Cabbage white butterfly caterpillars eating our brassicas), birds eating our fruit etc. Other forms of protection and assistance we would like is to protect from frost, warm the soil etc. This would take the form of "cloches".
The problem with these protective structures is that good husbandry dictates that we "rotate" our beds, growing different things in different beds each year. This helps both to prevent pests (by not providing their favourite prey in the same place repeatedly) and with nutrition (by planting different plants that require, or provide, different nutrients in succession).
In order to both protect our food, but allow for rotation, we have decided to build standard protection structures that can be moved between beds as we move the crops around.
We decided to make structures similar to small polytunnel frames in a standard layout. These frames could have a variety of coverings added to them to provide protection from birds, insects etc. We set a number of objectives for our design
1) They had to pack flat for storage when not in use
2) They had to be able to be moved and erected by one person
3) They had to be "modular" so that half or a whole bed could be covered.
The basic materials used in the beds were
A) 20mm HDPE conduit (bent over to form the "hoops" of the tunnel)
B) 2inch plastic waste pipe
C) lots and lots of 2" x 2" pressure treated timber to make a central "ridge support" for the tunnel
D) a variety of screws
E) Conduit clamps
F) Joining plates
Tools needed are
A) A Hacksaw to cut pipe
B) A steel tape measure
C) A marker pen for pipe
D) A chippies pencil for marking wood
E) A panel saw for cutting wood
F) A mitre box for cutting angles
G) Drill and drill bits
H) A screwdriver, power driver or socket driver
I) A drain / rabbit spade for digging narrow holes
J) A lump hammer for hitting things
H) 2 large G clamps

1 - Conduit and pipe by British Red, on Flickr

2 - 2"x2" by British Red, on Flickr
So, the first thing I did was to cut up a load of 2" waste pipe into 10" lengths. These lengths will be buried at the edge of the beds to form "sockets" into which the legs o the hoops can be inserted. They will be left in place, even when the frames are removed making subsequent erection of frames a much quicker job

3 - 2" waste pipe by British Red, on Flickr
The next job was to work out how high and long to make the central ridge support for each tunnel. The 2x2 I have is in 3 metre lengths so we decided to make each tunnel "module" 3m long

4 - Goal post plan by British Red, on Flickr
Doing weird maths to anticipate how high the bent conduit would end up (it is also 3m lengths), was...just too hard!
I decided to just set a hoop up and do it empirically...so to the veg beds! I took along a drain spade (to dig a narrow hole for the waste pipe "socket"), a hammer (to tamp the soil around the socket firmly) and a tape measure to site the sockets

5 - Hoop sleeves and tools by British Red, on Flickr
I dug a narrow hole about 9" deep (to leave an inch of the pipe above the surface)

6 - Hoop sleeve buried by British Red, on Flickr
The soil was tamped firmly back around the pipe with the club hammer

7 - Tamped in by British Red, on Flickr
The end of the pipe just showed proud from the soil

8 - Sleeves left in place by British Red, on Flickr
A 3m length of conduit was bent over and one end inserted into each socket

9 - Hoop in situ by British Red, on Flickr
Then, to work out the height of the central support, I just measured from the apex to the soil

10 - Measure Goal Post Height by British Red, on Flickr
This measured 104cm. I added 26cm for the element to be driven into the soil and added the dimensions to the plan

11 - Add height to plan by British Red, on Flickr
Knowing the uprights needed to be 130cm I measured them out

14 - Measure 2 x 2 to length by British Red, on Flickr
I used the mitre box to cut a neat point on the end of each upright

15 - Cut points on uprights by British Red, on Flickr
I measured where the uprights would come on the cross member and marked them up to screw the uprights in place

16 - Mark up butt joint by British Red, on Flickr
Putting the cross member on some sacrificial wood I drilled some pilot screw holes

17 - drill pilot holes on sacrificial wood by British Red, on Flickr
Sometimes I do use power tools - but to be honest, there is no need. A socket set with good adaptors makes a great screwdriver set

18 - driver set by British Red, on Flickr
Drill bits work fine on all drills - and we should all have a full set and plenty of spares of the common ones

19 - Drill bit set by British Red, on Flickr
On this job a brace and bit or hand drill would have been just fine. I often find them handier as there are no batteries to go flat, or extension cords to run. The one advantage of power drivers and drills is the ability to hold the workpiece with one hand and drill / drive with the other. More clamping is required when working "solo"!
Anyway, I placed the cross member on the upright, drilled pilot holes through the cross member and into the upright, then screwed the two together with 4" wood screws.

19 - Suprights lettered and marked by British Red, on Flickr
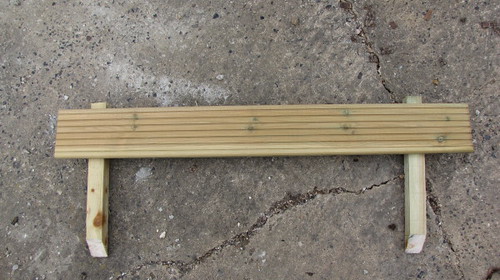
After screwing on the other upright, I was left with a "goal post" structure

21 - Goal post roughed out by British Red, on Flickr
Using the mitre box I used scrap 2x2 to cut corner supports and clamped them in place.

22 - Corner braces clamped by British Red, on Flickr
The corner braces were screwed in place with 3" screws

23 - Corner braces screwed by British Red, on Flickr
This left the completed "goal post" structure looking like this

24 - Goal post complete by British Red, on Flickr
On the leg of each goal post I marked the depth that it needed to be driven into the soil

25 - depth marked by British Red, on Flickr
The goal post was aligned to the centre of the bed at one end and (using a piece of sacrificial wood as protection), the uprights driven in to the required depth

26 - goal post knocked in by British Red, on Flickr
The position of each hoop was marked with a pencil

27 - conduit position marked by British Red, on Flickr
A conduit clamp was centered and screwed in place with an inch and a half screw

28 conduit clamp by British Red, on Flickr

29 - conduit clamp attached by British Red, on Flickr
The conduit clamp was used to secure the conduit to the central "goal post" apex support

30 - conduit clamped by British Red, on Flickr
Three "hoops" were attached to the apex support. They should not be more than 4' to 5' apart or the net will sag

31 - First frame completed by British Red, on Flickr
A second frame was placed at the other end of the bed

32 - Second Frame by British Red, on Flickr
Clearly these frames can be used independently - singly or in pairs - but on this occasion I wanted to cover the entire bed. For this I wanted to connect the two frames.
For this I used a piece of 2x2 with a joining plate at each end - this was screwed to both frames

33 - Joining Piece by British Red, on Flickr
This creates an "entire bed" frame

34 - Whole Bed covered by British Red, on Flickr
For crops that require insect pollination but bird protection (e.g. strawberries), a wide mesh will cover the frame to let the bees in but keep birds out. These will be held in place with releasable cable ties.

36 - Bird Mesh by British Red, on Flickr
You may note this is a high quality knotted cord net - not cheap polythene stuff - its stronger and lasts for years.
For keeping insects off cabbages, brussels etc. a much finer mush will be used

35 - insect mesh by British Red, on Flickr
For cloches, a lower frame will be used and covered in clear polythene - but of a small greenhouse was wanted, this height of frame could be used.
Red
Another reason we wanted to "standardise" our beds was that we have realised over the years, that some of our crops need protection or assistance. Some forms of that predation are insects (Cabbage white butterfly caterpillars eating our brassicas), birds eating our fruit etc. Other forms of protection and assistance we would like is to protect from frost, warm the soil etc. This would take the form of "cloches".
The problem with these protective structures is that good husbandry dictates that we "rotate" our beds, growing different things in different beds each year. This helps both to prevent pests (by not providing their favourite prey in the same place repeatedly) and with nutrition (by planting different plants that require, or provide, different nutrients in succession).
In order to both protect our food, but allow for rotation, we have decided to build standard protection structures that can be moved between beds as we move the crops around.
We decided to make structures similar to small polytunnel frames in a standard layout. These frames could have a variety of coverings added to them to provide protection from birds, insects etc. We set a number of objectives for our design
1) They had to pack flat for storage when not in use
2) They had to be able to be moved and erected by one person
3) They had to be "modular" so that half or a whole bed could be covered.
The basic materials used in the beds were
A) 20mm HDPE conduit (bent over to form the "hoops" of the tunnel)
B) 2inch plastic waste pipe
C) lots and lots of 2" x 2" pressure treated timber to make a central "ridge support" for the tunnel
D) a variety of screws
E) Conduit clamps
F) Joining plates
Tools needed are
A) A Hacksaw to cut pipe
B) A steel tape measure
C) A marker pen for pipe
D) A chippies pencil for marking wood
E) A panel saw for cutting wood
F) A mitre box for cutting angles
G) Drill and drill bits
H) A screwdriver, power driver or socket driver
I) A drain / rabbit spade for digging narrow holes
J) A lump hammer for hitting things
H) 2 large G clamps
1 - Conduit and pipe by British Red, on Flickr
2 - 2"x2" by British Red, on Flickr
So, the first thing I did was to cut up a load of 2" waste pipe into 10" lengths. These lengths will be buried at the edge of the beds to form "sockets" into which the legs o the hoops can be inserted. They will be left in place, even when the frames are removed making subsequent erection of frames a much quicker job
3 - 2" waste pipe by British Red, on Flickr
The next job was to work out how high and long to make the central ridge support for each tunnel. The 2x2 I have is in 3 metre lengths so we decided to make each tunnel "module" 3m long
4 - Goal post plan by British Red, on Flickr
Doing weird maths to anticipate how high the bent conduit would end up (it is also 3m lengths), was...just too hard!
I decided to just set a hoop up and do it empirically...so to the veg beds! I took along a drain spade (to dig a narrow hole for the waste pipe "socket"), a hammer (to tamp the soil around the socket firmly) and a tape measure to site the sockets
5 - Hoop sleeves and tools by British Red, on Flickr
I dug a narrow hole about 9" deep (to leave an inch of the pipe above the surface)
6 - Hoop sleeve buried by British Red, on Flickr
The soil was tamped firmly back around the pipe with the club hammer
7 - Tamped in by British Red, on Flickr
The end of the pipe just showed proud from the soil
8 - Sleeves left in place by British Red, on Flickr
A 3m length of conduit was bent over and one end inserted into each socket
9 - Hoop in situ by British Red, on Flickr
Then, to work out the height of the central support, I just measured from the apex to the soil
10 - Measure Goal Post Height by British Red, on Flickr
This measured 104cm. I added 26cm for the element to be driven into the soil and added the dimensions to the plan
11 - Add height to plan by British Red, on Flickr
Knowing the uprights needed to be 130cm I measured them out
14 - Measure 2 x 2 to length by British Red, on Flickr
I used the mitre box to cut a neat point on the end of each upright
15 - Cut points on uprights by British Red, on Flickr
I measured where the uprights would come on the cross member and marked them up to screw the uprights in place
16 - Mark up butt joint by British Red, on Flickr
Putting the cross member on some sacrificial wood I drilled some pilot screw holes
17 - drill pilot holes on sacrificial wood by British Red, on Flickr
Sometimes I do use power tools - but to be honest, there is no need. A socket set with good adaptors makes a great screwdriver set
18 - driver set by British Red, on Flickr
Drill bits work fine on all drills - and we should all have a full set and plenty of spares of the common ones
19 - Drill bit set by British Red, on Flickr
On this job a brace and bit or hand drill would have been just fine. I often find them handier as there are no batteries to go flat, or extension cords to run. The one advantage of power drivers and drills is the ability to hold the workpiece with one hand and drill / drive with the other. More clamping is required when working "solo"!
Anyway, I placed the cross member on the upright, drilled pilot holes through the cross member and into the upright, then screwed the two together with 4" wood screws.
19 - Suprights lettered and marked by British Red, on Flickr
After screwing on the other upright, I was left with a "goal post" structure
21 - Goal post roughed out by British Red, on Flickr
Using the mitre box I used scrap 2x2 to cut corner supports and clamped them in place.
22 - Corner braces clamped by British Red, on Flickr
The corner braces were screwed in place with 3" screws
23 - Corner braces screwed by British Red, on Flickr
This left the completed "goal post" structure looking like this
24 - Goal post complete by British Red, on Flickr
On the leg of each goal post I marked the depth that it needed to be driven into the soil
25 - depth marked by British Red, on Flickr
The goal post was aligned to the centre of the bed at one end and (using a piece of sacrificial wood as protection), the uprights driven in to the required depth
26 - goal post knocked in by British Red, on Flickr
The position of each hoop was marked with a pencil
27 - conduit position marked by British Red, on Flickr
A conduit clamp was centered and screwed in place with an inch and a half screw
28 conduit clamp by British Red, on Flickr
29 - conduit clamp attached by British Red, on Flickr
The conduit clamp was used to secure the conduit to the central "goal post" apex support
30 - conduit clamped by British Red, on Flickr
Three "hoops" were attached to the apex support. They should not be more than 4' to 5' apart or the net will sag
31 - First frame completed by British Red, on Flickr
A second frame was placed at the other end of the bed
32 - Second Frame by British Red, on Flickr
Clearly these frames can be used independently - singly or in pairs - but on this occasion I wanted to cover the entire bed. For this I wanted to connect the two frames.
For this I used a piece of 2x2 with a joining plate at each end - this was screwed to both frames
33 - Joining Piece by British Red, on Flickr
This creates an "entire bed" frame
34 - Whole Bed covered by British Red, on Flickr
For crops that require insect pollination but bird protection (e.g. strawberries), a wide mesh will cover the frame to let the bees in but keep birds out. These will be held in place with releasable cable ties.
36 - Bird Mesh by British Red, on Flickr
You may note this is a high quality knotted cord net - not cheap polythene stuff - its stronger and lasts for years.
For keeping insects off cabbages, brussels etc. a much finer mush will be used
35 - insect mesh by British Red, on Flickr
For cloches, a lower frame will be used and covered in clear polythene - but of a small greenhouse was wanted, this height of frame could be used.
Red
Com on wanre niht scriðan sceadugenga
-
British Red
- Barbara Good
- Posts: 111
- Joined: Sat Jan 12, 2008 9:27 pm
- Location: Mercia
Re: Making the Beds...our journey to a veg patch (picture he
Well now - time to put a net on one of the beds today to keep the cabbage whites off the brussel sprouts and other brassicas.
In keeping with our theme, all the parts for this are designed to quickly dismantle and store flat, Most importantly they are designed to move from bed to bed with crop rotation strategies. Once constructed, they should take no more than 10 minutes to put up or take down in season and less than one minute to open the net wide for weeding (something I find a chore with most netting arrangements).
So - our starting point was a standard sized bed , with a central ridgeline and conduit hoops.

A Tunnel Frame Built by British Red, on Flickr
What I need to add now is a way to secure the bottom of the net that keeps out the insects and birds, but allows quick, easy access for planting and weeding etc.
I have chosen to do this using another type on 20mm pipe - a long coil of 20mm blue MDPE.

B MDPE, fixings etc by British Red, on Flickr
Although MDPE will bend, it doesn't do 90 degree bends - I also want to be able to "unclip" just one side of the net - so I am going to cut two long and two short pieces of pipe and join them with these elbow joints

C Inspection Elbow by British Red, on Flickr
Unfortunately this cheap type don't come with any way of screwing them down - easily fixed with a drill though

D Drilled Elbow by British Red, on Flickr
A 4x40mm brass screw fixed one to each corner of the top edge of the bed

E Fixed Elbow by British Red, on Flickr
Now, I need to keep the pipe straight and tightly aligned to the top edge of the bed, To keep it there, I added a number of push in saddle cips to each side of the bed

F Sadlle Brackets by British Red, on Flickr

G Saddle Bracket Fixed by British Red, on Flickr
Then I cut a piece of MDPE the length of the side of the bed

H Cut MDPE by British Red, on Flickr
This was pushed into the elbows and the saddle clamps

I MDPE in place by British Red, on Flickr
Then I did the same for the other our sides. Its a bit cumbersome working with 75 yard coild of this stuff so give yourself room

J Remainder of the bed by British Red, on Flickr
I ended up with four lengths clipped tightly to the top edges of the bed

K MDPE Complete by British Red, on Flickr
Next I got a 10m x 3m length of net. This net is for insects (fine mesh). It prevents butterflies laying eggs on the brassicas. If I put this on the strawberries bees couldn't pollinate them, so a wider mesh is needed to let bees in but keep birds out

L Scaffold Net and fixings by British Red, on Flickr
The net is overlong for the 7.2m beds. This is because it has to "hang down" to cover the ends and because I want to have separate fixed net panels at the narrow ends of the bed

M Scaffold Net Over hoops by British Red, on Flickr
I cut a piece of each end to cover the narrow ends of the bed. One end was tucked inside the wooden board.

N One end tucked down by British Red, on Flickr
The bottom of the net was cable tied (through the mesh) to the blue MDPE pipe. A "skirt" was left to hang inside the wooden board to prevent any insects crawling under the blue pipe. The net was then cable tied to the black conduit and cut to size with scissors

O One end piece Secured by British Red, on Flickr
This was repeated at the other end of the bed

P Second End Secured by British Red, on Flickr
The large net piece was then spread to cover the gap between the end pieces

Q Main net in place by British Red, on Flickr
One end was clipped to the hoops with a few more saddle cips

R One end clipped in place by British Red, on Flickr
The net was stretched along the frame and clipped with more saddle clips at the other end hoop

S Stretch tight by British Red, on Flickr
This gave a nice tight finish. Note that there is a "skirt" again hangining outside the boards

T Tight Net by British Red, on Flickr
The net was cable tied to the "ridge pole" along its length

U Ridge line cable tied by British Red, on Flickr
The skirt was tucked in along each long side and the net cable tied to the blue pipe

V Bottom of net tucked and cable tied to MDPE by British Red, on Flickr
Thats it - the net is complete

W Insect Net complete by British Red, on Flickr
Just to test it, I unclipped one long side by simply unsnapping the blue HDPE and flipping it over the ridgeline

X - one side opened for planting by British Red, on Flickr
That seems to give plenty of room for weeding, planting etc. - and it met its criteria - less than a minute to open and close
Red
In keeping with our theme, all the parts for this are designed to quickly dismantle and store flat, Most importantly they are designed to move from bed to bed with crop rotation strategies. Once constructed, they should take no more than 10 minutes to put up or take down in season and less than one minute to open the net wide for weeding (something I find a chore with most netting arrangements).
So - our starting point was a standard sized bed , with a central ridgeline and conduit hoops.
A Tunnel Frame Built by British Red, on Flickr
What I need to add now is a way to secure the bottom of the net that keeps out the insects and birds, but allows quick, easy access for planting and weeding etc.
I have chosen to do this using another type on 20mm pipe - a long coil of 20mm blue MDPE.
B MDPE, fixings etc by British Red, on Flickr
Although MDPE will bend, it doesn't do 90 degree bends - I also want to be able to "unclip" just one side of the net - so I am going to cut two long and two short pieces of pipe and join them with these elbow joints
C Inspection Elbow by British Red, on Flickr
Unfortunately this cheap type don't come with any way of screwing them down - easily fixed with a drill though
D Drilled Elbow by British Red, on Flickr
A 4x40mm brass screw fixed one to each corner of the top edge of the bed
E Fixed Elbow by British Red, on Flickr
Now, I need to keep the pipe straight and tightly aligned to the top edge of the bed, To keep it there, I added a number of push in saddle cips to each side of the bed
F Sadlle Brackets by British Red, on Flickr
G Saddle Bracket Fixed by British Red, on Flickr
Then I cut a piece of MDPE the length of the side of the bed
H Cut MDPE by British Red, on Flickr
This was pushed into the elbows and the saddle clamps
I MDPE in place by British Red, on Flickr
Then I did the same for the other our sides. Its a bit cumbersome working with 75 yard coild of this stuff so give yourself room
J Remainder of the bed by British Red, on Flickr
I ended up with four lengths clipped tightly to the top edges of the bed
K MDPE Complete by British Red, on Flickr
Next I got a 10m x 3m length of net. This net is for insects (fine mesh). It prevents butterflies laying eggs on the brassicas. If I put this on the strawberries bees couldn't pollinate them, so a wider mesh is needed to let bees in but keep birds out
L Scaffold Net and fixings by British Red, on Flickr
The net is overlong for the 7.2m beds. This is because it has to "hang down" to cover the ends and because I want to have separate fixed net panels at the narrow ends of the bed
M Scaffold Net Over hoops by British Red, on Flickr
I cut a piece of each end to cover the narrow ends of the bed. One end was tucked inside the wooden board.
N One end tucked down by British Red, on Flickr
The bottom of the net was cable tied (through the mesh) to the blue MDPE pipe. A "skirt" was left to hang inside the wooden board to prevent any insects crawling under the blue pipe. The net was then cable tied to the black conduit and cut to size with scissors
O One end piece Secured by British Red, on Flickr
This was repeated at the other end of the bed
P Second End Secured by British Red, on Flickr
The large net piece was then spread to cover the gap between the end pieces
Q Main net in place by British Red, on Flickr
One end was clipped to the hoops with a few more saddle cips
R One end clipped in place by British Red, on Flickr
The net was stretched along the frame and clipped with more saddle clips at the other end hoop
S Stretch tight by British Red, on Flickr
This gave a nice tight finish. Note that there is a "skirt" again hangining outside the boards
T Tight Net by British Red, on Flickr
The net was cable tied to the "ridge pole" along its length
U Ridge line cable tied by British Red, on Flickr
The skirt was tucked in along each long side and the net cable tied to the blue pipe
V Bottom of net tucked and cable tied to MDPE by British Red, on Flickr
Thats it - the net is complete
W Insect Net complete by British Red, on Flickr
Just to test it, I unclipped one long side by simply unsnapping the blue HDPE and flipping it over the ridgeline
X - one side opened for planting by British Red, on Flickr
That seems to give plenty of room for weeding, planting etc. - and it met its criteria - less than a minute to open and close
Red
Com on wanre niht scriðan sceadugenga

Re: Making the Beds...our journey to a veg patch (picture he
Utter Fancastic - I done more or less the same regarding the beds (using 13' Scaffold reject boards) with 3' space between each row.
When I find my plot of land I entend to do it again and just like what you have done above.
Keep it up and will be following with very keen interest
When I find my plot of land I entend to do it again and just like what you have done above.
Keep it up and will be following with very keen interest
-
boboff

- A selfsufficientish Regular

- Posts: 1809
- Joined: Mon Jun 08, 2009 9:29 am
- Location: Gunnislake,Cornwall
Re: Making the Beds...our journey to a veg patch (picture he
Brilliant Red - Enjoyed that.
I wish I was as organised as you!
I wish I was as organised as you!
http://boboffs.blogspot.co.uk/Millymollymandy wrote:Bloody smilies, always being used. I hate them and they should be banned.
No I won't use a smiley because I've decided to turn into Boboff, as he's turned all nice all of a sudden. Grumble grumble.
-
sarahkeast
- Living the good life
- Posts: 292
- Joined: Wed Dec 23, 2009 8:26 am
- Location: Longridge, Lancs
Re: Making the Beds...our journey to a veg patch (picture he
Loved the photo journey, thanks. Totally envy the amount of space you have too. Please do keep on sharing
Sarah 
Re: Making the Beds...our journey to a veg patch (picture he
Wow!!!
Love and Peace
Jim
Love and Peace
Jim
The law will punish man or woman
Who steals the goose from off the Common
But lets that greater thief go loose
Who steals the Common from the goose.
Who steals the goose from off the Common
But lets that greater thief go loose
Who steals the Common from the goose.

Re: Making the Beds...our journey to a veg patch (picture he
so tidy! bravo and thanks for posting. I'm going to read in more detail later....
-
Pumpkin&Piglet
- Living the good life
- Posts: 315
- Joined: Wed Oct 26, 2011 7:56 pm
- latitude: 56 degrees North
- longitude: 2 degrees West
- Location: Near Stroud, Gloucestershire
Re: Making the Beds...our journey to a veg patch (picture he
I really liked reading all this and seeing the photos, thanks 
-
cideristhefuture
- Tom Good

- Posts: 81
- Joined: Mon Mar 28, 2011 10:05 pm
Re: Making the Beds...our journey to a veg patch (picture he
Great pictures.
-
Thomzo

- A selfsufficientish Regular
- Posts: 4311
- Joined: Thu Feb 01, 2007 1:42 pm
- Facebook Name: Zoe Thomas
- Location: Swindon, South West England
Re: Making the Beds...our journey to a veg patch (picture he
Very professional set up. Now that you've sorted out your plot, can you come and do mine please? 
Cheers
Zoe
Cheers
Zoe
-
British Red
- Barbara Good
- Posts: 111
- Joined: Sat Jan 12, 2008 9:27 pm
- Location: Mercia
Re: Making the Beds...our journey to a veg patch (picture he
I'd love to Zoe.....but today was building screening for the rainwater harvesting system plus assembling a trailer that came in about 400 parts :)
Tomorrow is domestic chores, Thursday hopefully weeding, Friday cooking, Saturday shooting, Sunday beekeeping course.
I wanted to make some soap this week and really wanted to get cracking on the walk in fruit cage for can fruit this Spring....fat chance of that with the weather as it is
Still - at least the potting shed that we re-roofed over winter is there now to get some chores done in

Roof on Barn by British Red, on Flickr
Thanks for the kind words all - don't encourage me too much or I'll bury you in this stuff ;)
Red
Tomorrow is domestic chores, Thursday hopefully weeding, Friday cooking, Saturday shooting, Sunday beekeeping course.
I wanted to make some soap this week and really wanted to get cracking on the walk in fruit cage for can fruit this Spring....fat chance of that with the weather as it is
Still - at least the potting shed that we re-roofed over winter is there now to get some chores done in
Roof on Barn by British Red, on Flickr
Thanks for the kind words all - don't encourage me too much or I'll bury you in this stuff ;)
Red
Com on wanre niht scriðan sceadugenga