Straw Bale Build - image intensive!

Anything to do with environmental building projects.
Post Reply
User avatar
Thurston Garden
A selfsufficientish Regular
Posts: 1455
Joined: Fri May 25, 2007 3:19 pm
Location: Scottish Borders
Contact:

Straw Bale Build - image intensive!

Post: # 272646Post Thurston Garden »

I thought I would do a step by step post on my load bearing straw hoose. We started in spring 2011 and completed just before Christmas of the same year.

Image
The site is 0.5 acres and a new access road had to be put in.

Image
A horizontal reed bed was created to deal with the grey water (shower, sinks and washing machine. The water drains from the house into the holding tank. Hot water enters the tank and cold water exits into the reed bed.

Image
Rather than digging into the sloping site, a platform was created on a grid of 32 telegraph and power poles dug 5 feet into the ground. The photo shows the back row of poles - the north elevation of the house.

Image
Tenons were cut in the top of the poles and two larch beams 12" deep and 3" wide were bolted on to create a ring beam. On top of this a sandwich floor was built using engineered wooden I-beams with OSB sheeting top and bottom. We covered this with black polythene as a temporary weather proofing. Around the perimeter, a larch 'train track' was built with larch spikes onto which the bottom course of bales were placed. The upright timbers are temporary supports for the building corners.

Image
Straw is packed inbetween the 'train track' before the first bales are laid to minimise thermal bridging at the base of the wall.

Image
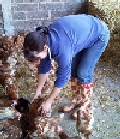
Larch stakes are pounded down through the various courses of bales.

Image
Wooden boxes or bucks were made for each of the window and door openings. These are pinned into the bales once the roof is on and the bales are fully compressed using larch stakes. The windows and doors just slide into the bucks afterwards.

Image
Keeping the bales dry is imperative and became the bane of everyones lives until the roof was on :roll:

Image
A timber ring beam (identical to the train track at the base) is pinned to the wall head again with larch stakes. This distributes the weight of the roof evenly onto the bales.

Image
Green oak trusses and purlins were made off site and craned into place. The inside of the house is open to the underside of the roof which hangs off the purlins - the horizontal oak beams which run the length of the building. They rest on the timber gables and transfer the load down into the bales.

Image
The roof is a sandwich of OSB and engineered I-beams identical to the floor. The gables are the same but much thicker to match the thickness of the bales below them. The deck to the front and east of the house begins to take shape in this photo and the reed bed was planted up I lived on site in a caravan which was hooked up temporarily to the reed bed.

Image
This photo shows the underside of the roof and the inside of the west gable before the inside OSB skin was attached. Warmcell insulation will be blown in the gaps in between the I-beams. You can also see the two horizontal purlins in the roof and the thick timbers in the gable taking the load down onto the top ring beam.

Image
The house faces due south and the bedrooms, bathroom and pantry are all at the rear. Normal stud partitions form the rooms. The front section - kitchen, dining and living areas are all to the front and open plan.

Image
The front section - kitchen, dining and living areas are all to the front and open plan.

Image
The roof was slated using second hand welsh slates. The deck has a shallower pitched roof and was carefully designed so as to prevent direct sunlight coming in through the front windows between March and September. A 2.3kW solar array was fitted. Although not in this picture, solar thermal was also fitted - the brackets are fitted in the photo but not the tubes. Yet.

Image
holes were drilled in the OSB in the floor, gables and ceilings in between each I-beam ready for the insulation to be blown in.

Image
Insulation fills the void in the roof, floor and gables.

Image
This photo shows the top of the compost toilet chamber. The chamber is underneath the house - another reason for building it on piles rather than digging the house into the sloping landscape.

Image
The toilet chambers are the only part of the house build with blocks and cement. It seemed an appropriate place to reuse some of the yellow danger of death signs from the power poles. :lol: The chambers got timber doors later on.

Image
The outside of the house was wrapped in chicken wire and three coats of lime render applied. The top coat was pre coloured - no painting required!

Image
The outside of the gables were clad with larch boards. The structre to the right of the back door is my tool shed and houses the electricity meters and inverter for the PV array.

Image
A timber balustrade finishes the front deck. this photo was taken in November and shows the sun shining on the front windows making full use of what solar gain there is in Scotland.

Image
The inside of the straw is plastered with clay. Chicken wire is only used around the windows after the straw was shaped using a chainsaw. The upper part of the gables and the ceiling are plastered in the normal way - these parts don't need to breathe.

Image
Here's the solar thermal being fitted. I am pleased how this has performed despite the weather. It is backed up by a Morso Squirrel stove with a back boiler. The stove is the only source of heating in the house.

Image
Electrics were kept, where possible, in the timber partition walls. The few that are in the straw walls are fed through ducting and the metal boxes screwed to a 2" by 2" wooden spike driven into the bales. The vertical wire to the right of the socket is part of the pre-tensioning system for the bales. Wires were run under the bottom train track and up over the top wall plate and tensioned using fencing gripples. This pulls the top wall plate down and compresses the bales before the roof went on. (bugger - I was trying to do this in order :oops: )

Image
The kitchen units were made off site from timber salvaged from the High Level Bridge in Newcastle. The same timber was also used for the skirtings, window cills and doors later on.

Image
It took ages for the clay to dry out due to the weather but eventually it did and it was painted with clay paint. The battens on the floor are there to take the oak flooring. This gap was also insulated. The dog pretends to be a fridge.

Image
This is the urine separator for the compost toilet. The straight edge goes to the front. Solids fall through the hole to the rear and the pee goes down the hole at the front. The pee goes to the reed bed. Everyone sits to pee. Even the men.

And here's the end result!
Image

Image

Image

The house is 1,000 sq ft (open plan living room, dining room and kitchen/two beds/walk in wardrobe/office/bathroom/pantry/tool shed) and although I have never had the courage to total it up, I think it cost about £150k to build. I project managed the build but there was a lot of labour involved which really formed the brunt of the cost. There were several weeks where the covering and uncovering the bales before the roof went on was taking 3 hours a day :pale:

I have lived in the house for just over a year now and have bought approximately £150 worth of logs for the stove. I will have had £900 back from my PV - mainly Feed In Tariff, although I have exported more leccy than I have consumed. Electric consumption is averaging 1.3kW a day and my bills from Ecotricity are c.£50 a quarter. Half of that cost is fixed charges. Insurance was tricky to find but my premium for building and contents is £300. There's no sewerage charge so Council Tax and water totals £1000 a year.

Was it mentally and emotionally draining? Yes. Do I love it? Yes! Would I do it again? Nooooooooooo! I will go out of this house feet first :wave:
Thurston Garden.

http://www.thurstongarden.wordpress.com
Greenbelt is a Tory Policy and the Labour Party intends to build on it. (John Prescott)

GeorgeSalt
Living the good life
Posts: 425
Joined: Sat Apr 28, 2012 10:21 am
Location: West Norfolk, UK

Re: Straw Bale Build - image intensive!

Post: # 272652Post GeorgeSalt »

Great write-up, you've done a grand job.
Curently collecting recipes for The Little Book of Liqueurs..

User avatar
southeast-isher
A selfsufficientish Regular
Posts: 1206
Joined: Wed Jul 08, 2009 7:41 pm
Location: Great Britain

Re: Straw Bale Build - image intensive!

Post: # 272656Post southeast-isher »

WOW

*impressed*

User avatar
Jandra
Living the good life
Posts: 490
Joined: Sun Jun 24, 2007 7:29 pm
Location: Germany (Dutch/German border)
Contact:

Re: Straw Bale Build - image intensive!

Post: # 272657Post Jandra »

What can I say... Wow! Thanks for sharing.

skeast
Jerry - Bit higher than newbie
Posts: 49
Joined: Sat Jan 12, 2013 10:29 pm
Location: Longridge, Lancs

Re: Straw Bale Build - image intensive!

Post: # 272659Post skeast »

Fabulous, what a marvelous job. So jealous.

Tried to look at your blog, but access was denied, am I missing something, apart from more house tales ?

Sarah

User avatar
Thurston Garden
A selfsufficientish Regular
Posts: 1455
Joined: Fri May 25, 2007 3:19 pm
Location: Scottish Borders
Contact:

Re: Straw Bale Build - image intensive!

Post: # 272663Post Thurston Garden »

Thanks for all the positive comments. It was good to upload the photos - there's more on my flickr account but I shut my blog down. It was used in the old Thurston Garden days when, as some of the stalwarts on here may remember, I played at market gardening, keeping pigs and hens and such. I am tempted to look at the blog from time to time but it reminds me too much of a personal period I would rather forget now.
Thurston Garden.

http://www.thurstongarden.wordpress.com
Greenbelt is a Tory Policy and the Labour Party intends to build on it. (John Prescott)

User avatar
bonniethomas06
A selfsufficientish Regular
Posts: 1246
Joined: Wed Oct 17, 2007 10:24 am
Location: Wiltshire, UK

Re: Straw Bale Build - image intensive!

Post: # 272666Post bonniethomas06 »

Wow wow wow, it is totally beautiful. Well done you - to have the foresight to plan and determination to see through such a huge project, is fantastic.

Well done you! And thanks for the amazing photos.
"A pretty face is fine, but what a farmer needs is a woman who can carry a pig under each arm"

My blog...

http://www.theparttimesmallholder.blogspot.com

User avatar
boboff
A selfsufficientish Regular
Posts: 1809
Joined: Mon Jun 08, 2009 9:29 am
Location: Gunnislake,Cornwall

Re: Straw Bale Build - image intensive!

Post: # 272667Post boboff »

Absolutely love it!

I want to build one on our small holding and "retire" to it at some point!

Excellent job!
Millymollymandy wrote:Bloody smilies, always being used. I hate them and they should be banned.
No I won't use a smiley because I've decided to turn into Boboff, as he's turned all nice all of a sudden. Grumble grumble.
http://boboffs.blogspot.co.uk/

Skippy
Living the good life
Posts: 493
Joined: Mon Jul 16, 2012 5:13 pm
Location: south staffordshire

Re: Straw Bale Build - image intensive!

Post: # 272689Post Skippy »

Looks very good indeed. A straw bale building is about the only sort of building I've not been involved with at any time. The "tensioning wires" look interesting and I can see how they work but I 'd like to ask if the whole thing still settles after the weight of the roof goes on? I can't see any cracks in the pictures that seem to "develop" in many buildings as settlement or drying out occurs using what are normally called traditional building materials such as lime and clay.

Pete

User avatar
Thurston Garden
A selfsufficientish Regular
Posts: 1455
Joined: Fri May 25, 2007 3:19 pm
Location: Scottish Borders
Contact:

Re: Straw Bale Build - image intensive!

Post: # 272695Post Thurston Garden »

Thanks for all the positive comments!

Pete - I think with hindsight two things could have been done differently regarding the settlement. We built in a 3 inch compression gap above the windows and doors. The central spine partition wall is also load bearing and was built in two halves, upper and lower with a 3 inch compression gap in between. I have no idea where the 3 inch calculation from!

Image

You can see the gap almost closed in between the wall plate and the top of the window buck in this photo - its narrower at the right hand side of the window than at the left. On that particular window the gap closed completely by the time we started on the clay. You also can see the recycled garden hose that the fence wire was fed through as it runs over the top of the wall plate, but under the three 6 by 2's ganged together into a 6 by 6 to spread the roof load on to the bales.

Another inch would have been better, or even half an inch. I have had to remove and plane the bottom off the front door (a regret with a factory finished door set!) and although the spine wall is fine it's always at the back of my mind that it's under an immense stress. I suppose thats what load bearing is though!

Image

This photo shows the load bearing partition. The upper 3 by 2 studs and the 8 by 2 horizontal timber were in one section. Then a 3 inch gap and then the 3 by 2 stud work below. In the photo the gap is almost closed. The tantalised scrap timber nailed vertically in the left of the photo was one of many temporary straps to keep the two sections plumb together until they closed up when they were fixed together.

Totally finishing the slating and waiting a couple of months for the load to settle (I calculated there's 5 tonnes on top of the straw!) would have been good in an ideal world. Timing wise, this would have taken us into late November which is less than ideal for lime as you will know. I could have thrown more labour at the job earlier in the build to move it on but I did not have the cash and leaving the straw exposed through the winter was a no no.

There has been settlement cracks in the clay where the partition walls meet the straw. These are easily taken care of now the building has stopped moving: a wee spray bottle with water and a damp sponge does the trick. The clay softens and is malleable again and the cracks can be rubbed out. A coat of clay paint once it dries and you would be none the wiser.

There are a couple of hairline cracks in the lime but these are not due to movement of the straw - they are in odd places and in odd directions. I have not decided what to do with them yet. I dont think the lime can be rehydrated like the clay - maybe a slip mix rubbed in with a sponge would do it but as it is pre coloured, I am worried it will be very visible. One day I will ask Masons Mortar in Edinburgh where I bought it. The top coat is not a pure lime but has an additive in it as well as the colour. MM supplied the stuff for straw houses in Alaska and recommended it over pure lime.

Jings, I can be a right straw bale bore can't I :pale:
Thurston Garden.

http://www.thurstongarden.wordpress.com
Greenbelt is a Tory Policy and the Labour Party intends to build on it. (John Prescott)

Skippy
Living the good life
Posts: 493
Joined: Mon Jul 16, 2012 5:13 pm
Location: south staffordshire

Re: Straw Bale Build - image intensive!

Post: # 272717Post Skippy »

If you're a bore I don't know what it says about those of us that are genuinely then ,


Pete

DuncanK
margo - newbie
margo - newbie
Posts: 2
Joined: Fri May 03, 2013 9:09 am
latitude: 52.60
longitude: 1.08
Location: Norfolk

Re: Straw Bale Build - image intensive!

Post: # 273651Post DuncanK »

Looks fantastic, thanks for all the info on this and the other thread about costings. Your design is very similar to what we have been thing of ... if we can ever find some land !

alun
margo - newbie
margo - newbie
Posts: 21
Joined: Tue Nov 08, 2011 9:08 am
Location: South Wales
Contact:

Re: Straw Bale Build - image intensive!

Post: # 273668Post alun »

RE Hairline cracks in the lime render:

This is not unusual, and just happens as the render dries slowly. Limewash is recommended to help recoat the walls and help seal up any hairline cracks that open up. See if you can get some in your colour!

joedavid
margo - newbie
margo - newbie
Posts: 1
Joined: Thu Jan 16, 2014 10:51 am

Re: Straw Bale Build - image intensive!

Post: # 277414Post joedavid »

What a fantastic project! Congratulations on such a success :)

Not quite as glamourous; I'm currently getting an oak garage on at my house down here in Hampshire. They've done a terrific job so far. Their workers have also done similar work to this in the past and they have a similar project in Sussex starting soon. I'm in the process of persuading them to keep us posted on here :)

User avatar
doofaloofa
A selfsufficientish Regular
Posts: 1351
Joined: Sun Feb 05, 2012 9:50 am
Location: Wesht Cark, RoI

Re: Straw Bale Build - image intensive!

Post: # 277419Post doofaloofa »

Cool!
ina wrote: die dümmsten Bauern haben die dicksten Kartoffeln

Post Reply